Kitchen-tested by Cokes Pizza
Every recipe and dough on Cokes Pizza has been prepared and tested in practice. The test setups included conventional home ovens and stone ovens preheated with wood. The stone-oven tests ran at approximately 300–380 °C, occasionally close to 400 °C; at that heat, a thin pizza was typically ready in about 2–3 minutes. Read our testing method.
Why this works
Classic Pizza Dough – The Authentic Neapolitan Recipe works best when dough, moisture, cheese and heat stay in balance. The topping should taste bold without weighing down the base, so the sauce is spread thinly, wet ingredients are controlled and the pizza is baked hot enough for a crisp base and an airy rim.
Ingredients
- Tipo 00 flour500g
- Cold water (15°C)325ml
- Fine sea salt12g
- Fresh yeast2g
- Extra virgin olive oil15ml
Method
- Dissolve yeast in a small amount of the cold water. Let it sit for 5 minutes.
- Combine flour and salt in a large bowl. Make a well in the center.
- Gradually pour in the yeast water and remaining cold water. Mix with a fork, then by hand until a shaggy dough forms.
- Knead on a lightly floured surface for 10–12 minutes until smooth and elastic. The dough should pass the windowpane test.
- Add olive oil and knead for another 2 minutes until fully absorbed.
- Form into a tight ball, place in a lightly oiled container, cover with plastic wrap.
- Refrigerate for 48–72 hours. The dough should roughly double in size and develop a slight tang.
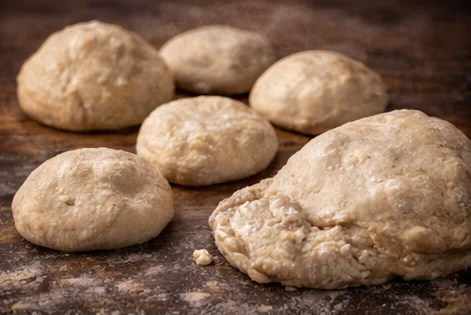
- Remove from fridge 2 hours before baking. Divide into 250g balls, shape tightly, and rest covered at room temperature.
- Stretch gently by hand—never use a rolling pin. Start from the center, working outward, leaving a 1.5cm rim.
- Top and bake at the highest temperature your oven allows (250–300°C) on a preheated stone or steel for 8–12 minutes.
Bake times by temperature and setup
For Classic Pizza Dough, bake time is not one fixed number. At 250 °C, baking steel can mean 4-7 minutes, while a regular tray is closer to 7-11 minutes. At 200 °C it takes longer, but the risk of burning the topping before the base sets is lower.
| Setup | Temperature | Bake time | Result / when to pull it |
|---|---|---|---|
| Tray, not preheated | 200-220 °C | 12-18 min | Reliable, but less oven spring. Good for thicker, wetter or family-style pizzas. |
| Preheated tray | 240-260 °C | 7-11 min | Better base. The pizza is ready when the rim is browned and the underside sounds dry. |
| Pizza stone, preheated 45 min | 250-280 °C | 6-9 min | Crisper, drier base. Do not load too early or the center stays soft. |
| Baking steel, preheated 45 min | 250-300 °C | 4-7 min | Very strong bottom heat. Thin pizza can genuinely finish fast at 250-300 °C. |
| Stone oven, preheated with wood | about 300–380 °C, occasionally near 400 °C | about 2–3 min | Turn as the rim colors; pull when the underside is browned and dry. |
The pizza is done when the underside is dry and lightly browned, the rim has color and the cheese no longer looks watery. If only the rim is dark while the center stays soft, bottom heat was too weak or the topping was too wet.
Dough timing and rest points
Dough does not improve just because it sits around; flour hydrates, gluten relaxes and fermentation builds flavor. This table helps match timing to the dough type.
| Dough type | Time | How to read it |
|---|---|---|
| Quick dough | 20-60 min | Good for everyday pizza; flavor stays mild. |
| Classic yeast dough | 8-24 h | More flavor, better stretch, less yeasty taste. |
| Cold fermentation | 24-72 h | Best balance of flavor, structure and planning. |
| Gluten-free / psyllium | 20-45 min hydration | Do not knead like wheat dough; water binding matters more than strength. |
| Low-carb / seed bases | 10-30 min hydration | Par-baking often matters more than long resting. |
Under-rested dough tears and snaps back. Overproofed dough feels slack, sticky and loses oven spring. The best point is in between: soft, stretchy and still full of tension.
Kitchen test notes
Classic Pizza Dough lives or dies by dough feel. The dough should not look dry and cracked; it should feel elastic and slowly spring back after pressing. If it tears immediately, it needs rest or a little more water; if it feels like paste, it needs structure or more time for the flour to hydrate. The key is balance: thin sauce, controlled moisture and enough heat so the base and topping finish at the same time.
When testing the result, look at the base first: is it stable enough, does it carry the topping, and does the rim break airy rather than dry? Only after that is it worth adjusting topping amount or stronger seasoning.
Baking: tray, stone, steel or pizza oven
Classic Pizza Dough does not behave the same in every oven. What matters is how quickly the base gets heat and how long the topping is exposed to strong top heat.
- Tray: On a regular tray, the pizza is more reliable if the tray is preheated and the topping is not too wet. Expect a slightly longer bake and a little less oven spring.
- Pizza stone: On a pizza stone, the base dries and browns more evenly. Preheat the stone for at least 35-45 minutes; otherwise it behaves like a cold slab in the oven.
- Baking steel: Baking steel gives the strongest bottom heat. It is excellent for crispness, but it demands thinner sauce and closer timing so the topping does not lag behind.
- Pizza oven: In a pizza oven, speed matters: very hot, short bake, constant turning. Toppings must be thin and dry enough because there is little time to drive off moisture.
Times are practical guidelines. Every oven runs differently; watch rim color, base texture and cheese instead of trusting only the clock.
Troubleshooting the result
- Dough keeps snapping back: cover it for 10-15 minutes, let it relax, then shape again.
- Base stays dense and heavy: do not degas it like bread dough; leave the rim alone while shaping.
- Bottom stays pale: preheat the tray, stone or steel longer and start the pizza lower in the oven.
- Flavor tastes flat: weigh the salt properly and use more time rather than more yeast for yeasted doughs.
Variations that actually make sense
- For deeper flavor, move part of the rest to the fridge.
- For more crispness, start the base without very wet toppings.
- For family portions, weigh dough balls so every pizza bakes consistently.
If Classic Pizza Dough is not perfect on the first run, the cause is usually heat, moisture or topping load, not a mysterious secret trick.
Nutrition & health
Estimated values from the listed ingredients. Brands, exact dough weight, draining and baking loss can change the numbers.
| Value | per serving | per 100 g |
|---|---|---|
| Calories | 977 kcal | 249 kcal |
| Protein | 25.1 g | 6.4 g |
| Carbs | 190.1 g | 48.4 g |
| Fat | 10.5 g | 2.7 g |
| Saturated fat | 1.6 g | 0.4 g |
| Sugar | 0.8 g | 0.2 g |
| Fiber | 6.8 g | 1.7 g |
| Approx. salt | 5.8 g | 1.5 g |
Health notes
- Energy-dense: filling, but not a light everyday portion.
- High in protein for a pizza, usually from cheese, meat, fish or protein-rich dough.
- High in sodium: with salami, cheese or preserved toppings, avoid adding much extra salt.
- Good fiber level, mainly from seeds, vegetables or alternative doughs.
Allergens & notes
Gluten
Do not treat this as medical or dietary advice. If allergies matter, check ingredients and packaging.
Pro tips for a better result
With Classic Pizza Dough – The Authentic Neapolitan Recipe, balance matters more than volume. Use a fully preheated oven, a hot tray, pizza stone or baking steel, and keep the topping precise rather than overloaded. That keeps the base stable, the rim browned and the texture clean instead of heavy.
- Bake hot and short rather than low and long to protect the base from moisture.
- Drain or pat dry wet ingredients before they go on the pizza.
- Spread sauce and cheese evenly while leaving a small clean rim.
- Let the pizza rest for 1–2 minutes before slicing so the topping stays in place.
Variations and adjustments
You can make the recipe milder, hotter, richer or lighter as long as you control moisture. More cheese does not automatically mean more flavor; balance between sauce, salt, acidity and fresh finishing ingredients usually matters more.
Storage and reheating
Keep leftovers airtight in the fridge and eat them within 1–2 days. Reheat in a hot pan with a lid or in a well-preheated oven. A microwave softens the base, so crisp it briefly in a pan afterwards if needed.